Showing posts with label Creative Children. Show all posts

Saturday, 15 June 2013

Teaching Toddlers to Cut

I took these pictures quite a few weeks back now but felt compelled to write about them today due to the incredible difference in Idris's cutting skills in such a short time. I can remember sitting with Faith for hours at a time whilst she mastered scissors and it was a pleasure to be able to replicate that for Idris! I had noticed that he was becoming more interested in the tools that the girls were using and was naming things like 'sizzies'. I picked up a pack of coloured electrical tape in the pound shop when I was in town ready for him..... and off we went as soon as he said 'sizzies, me'
I love the concentration on his face and his opening and closing mouth as he cuts. He started out using one hand on each scissor handle. I gave him proper craft scissors that were sharp enough to cut well but without pointed ends. Blunt toddler scissors simply frustrate children when they are learning to cut and do them no favours as in struggling to cut with them they could hurt themselves more. I have two pairs of scissors with looped handles that spring back open when released and only need squeezing to cut with, without having to worry about which fingers go in which holes. I have left and right handed pairs as you never know which way a little one is going to go! Faith loved cutting with them but Idris eschewed them in favour of a pair the girls were using! I also have a pair that has a small plastic spring on one handle that when folded down helps the blades to spring open easily again..... they came in useful later on.... for the first stage, just let your child hold and move the scissors how they feel comfortable.
It is useful to hold the paper up for them, at right angles to where they are cutting so that they only have to concentrate on moving the scissor blades, not on manipulating them to get them round the paper. You will sense when is the right time to start letting them do both. You can see from the picture that Idris quickly moved on to attempting to use the scissors with one hand only. It wasn't very successful but I said nothing and let him guide his own progress!I also avoid saying too much about which way up to hold the hand...... words get in the way of a concentrating toddler and they will find their own way! Faith was 16 months when she started cutting, Idris is about 22 months here. The first step with learning to cut is usually 'fringing' around the edge of a piece of paper, making a single cut then opening the scissors and making another cut.
With the electrical tape I held that out tight so that they scissors would cut first time and then Idris either showed me where to stick it or put it down for himself. It is nice to use the coloured tape as they can see where it has gone better than clear tape and allows choice of colour too.... Idris was keen to pull out the tape by himself, another reason why electrical tape is good for toddlers as finding and keeping the end is easy and it doesn't wrap itself up quite so much as clear tape!! It also has the benefit of strengthening fingers and increasing co-ordination and control!
After about an hour cutting and sticking, Idris stopped, looked up, gave a huge sigh then jumped down from the table and took his card with him to show Daddy what he had done with the sizzies.... the picture was ceremoniously pinned to the kitchen door with his big sister's pictures and he was so thrilled, he kept coming back to look at it and say 'me, sizzies'!!!!
Roll on a few weeks and he has asked to use scissors quite often. He likes to carry them with him and although I balked at this to start with I then decided to allow it within the parameters of it being a blunt-ended pair and of him carrying them properly with the blades in his hand and pointing down. He forgets a lot but if I say 'carry your scissors properly please' he immediately turns them round again! He has tried cutting all sorts of things and has developed really good cutting skills, so much so that he now cuts one handed, in straight lines across a piece of paper and at a furious pace! Under the table is littered with pieces of snipped paper several times a day at the moment! 

Today's interest was in cutting boxes, it was fascinating to watch him try different techniques and angles until he found one that worked. The recycling bin is a great source of materials to practise cutting skills on - catalogues, thin cardboard boxes, plastic fruit boxes, wax paper cups..... all provide a new experience! Other things to give your toddler to cut up are play dough, drinking straws, vegetable peelings and leaves and thin twigs from the garden!


Sunday, 31 March 2013

Faith's First Story!

Faith made this book today and sat down and asked me "Mummy how do you spell Once upon a time?". I helped her to spell it and she sat for ages writing a wonderfully exciting story..... not a punctuation mark in sight but it doesn't matter. It's so exciting when this happens! I love it!! I especially love it as it was all her own idea! It was interesting to see her looking back for words she had already written to see how to spell them again when she wanted them, instead of asking me again. I was able to scaffold some 'spelling thinking' for her which was great and she responded to that and used knowledge from the reading reflex system that we use. The story so far goes like this:

Once upon a time there was a litul girl that went to her Grannys huos and on the way she saw a monst she scream the monst looked rouan at her
her Granny luct out the window and saw the monster chasing the litul gul a way
a wood chopper was chopping wood the monster looked round and started to chasing the wood chopper
 
I am looking forwards to the next chapter which she is going to write tomorrow apparently!

Wednesday, 31 October 2012

An Impromptu Pumpkin Carving Session!

 These were the spooky results of our impromptu pumpkin carving session last week - courtesy of the fab offer that a certain supermarket had on! Dewi went all technical and made a spider on a web....
 I made an owl sitting on a branch with a cloud floating atmospherically past, although on reflection, it looks far more like a cat sitting on a branch, and by the time I took the pictures, it had flopped over backwards and was being propped up by an apple twig through the beak - painful!
 This is Eve's - she went to town with haunted houses, ghosts, bats etc etc - there wasn't a lot of pumpkin left really afterwards!!!!
 Faith did a special on witches hats - all carved free hand and a very impressive selection I thought!
 There were a few classic pumpkin faces just for good measure......
And they looked great all glowing away together in the gloom outside!
 This was the scene mid-carving........
 Faith wielding the pumpkin carving mini-saw like a seasoned pro!
 Eve realised that she needed a larger opening to get her pumpkin innards out of!
 Dewi being all technical about the process........
And guess who wanted a piece of the action - he was desperate to get his hands on a pumpkin saw but had to settle for a scooper instead!!

Monday, 9 July 2012

Rag Rugging is Addictive!


Welcome to a peek at our latest craft adventure- rag rugging (not sure if that is the proper term but that's what we call it!). A friend introduced us to the joys of Blists Hill Victorian Town two weeks ago, an amazing place of Victorian shops, houses and amusements where you really can live the history! I have no pictures of the day as I chose to leave the camera at home and just enjoy the time with my children! As we explored, I was struck by how many creative pursuits people (mainly women in the home) followed back then - everywhere we went we saw embroidery, rugs, lace, paper cutting, peg dolls, the skills the women had back then seemed endless. It touched me how much of that is sadly lost now that every convenience can be bought and replaced when the desire strikes. Many of the crafts were from cheap, recycled materials where waste items were re purposed into beautiful, cheerful decorations that made their simple homes snug and cozy. I quizzed the lady making rag rugs very carefully and decided we could manage to have a go!!! My friend stood us the hessian for the bargain price of £2.50 (as we'd spent ours on candles, the swing boats, and lacy handkerchiefs!!).

This is a picture of the back of the corner of the rug that I have started - we chose a pattern of circles, made by drawing around various cups, bowls and plates with a felt pen!! I'm not sure if I am doing it exactly right but it looks effective and once you have done a few, you get into a rhythm and it goes along faster!

Above, you can see us all working on the rug together, using tools made from a dolly peg snapped in two and then with a point formed carefully and blunted.

I chose two old duvet covers given by another friend - one brown with little flowers and one in yellow spots and stripes - I am not sure if they will be enough to do the whole rug but I'm hoping! I cut them up into small strips about 1 inch by 3 inches and put them in a soft bag for easy access, the rug and tools can be stored alongside them!

The technique is to poke a hole in the hessian with the point of the tool, push one end of the strip through, then move about four fibres down and make another hole and push the other end of the strip through, then pull it taut with your other hand from the other side of the fabric. I found it easier to work in a block, and to work from right to left so you aren't trying to hold the bunched up fabric you've already put in, out of the way!

This shows some of the circles we made for the pattern - I've done more than is in this picture and finding it very therapeutic! It's a bit like the wet felting we tried in that it doesn't require a precise finish so it is very forgiving to the beginner or serial multi tasker like myself!! I'm also impressed that, as we cut the hessian in half, this has so far cost £1.25 - the cheapest craft we have ever tried I think!!! We'll be back to Blist's Hill soon as it was so lovely - I may even take my rug to show them what we've been up to!

Friday, 22 June 2012

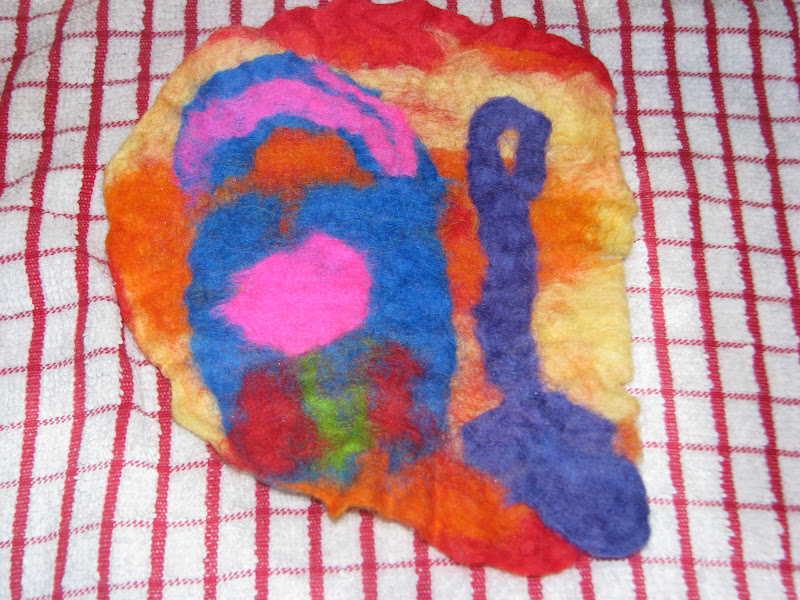
Felted Pictures Made with Wool Roving

I have had this wool roving for three years - seriously - and haven't got around to using it until now. Yesterday we went to a breastfeeding week event and the girls made little butterflies from wool roving balls felted down. It reminded me that I had some and we should really use it....... so this afternoon we did, and boy did we need that crafting time! My lovely girls have been revolting for the last 24 hours and it turns out they just needed an intensive hour and a half of crafting with Mummy to reset their moodometers to a rosier level!!!!

Eve made a garden with hers - this is quite a late stage where she was agitating the individual pieces on. We tried two slightly different methods - first of all, we made the base then added the 'picture pieces' on top and re felted it. After that we tried putting it all together in one go and felting it under a criss cross cookie sheet. Both methods worked and had different advantages - the first one meant that the felt base was wet and putting the small details on top was easier as they stuck, but the second method felted together more securely. The girls loved doing it and I think we will develop our method as we carry on experimenting!

 This is the first step - make the pieces wispy and spread them out into a shallow tray, dish oven pan etc etc.....

 Make up three layers, placing every new layer at right angles to the previous layer...

 This was the first base felted into a lovely neat round.....

 These are some of the tools that we used to add the detail into the picture - just from the kitchen drawer!! The bubbles are from washing up liquid, as far as I know, any soap will do!!

 We agitated the smaller details by hand - it feels wonderful, all slippy and silky!

 When we thought they were felted enough, we rinsed them under cold water and squeezed the excess out with a tea towel - this is Faith's bucket and spade!

Faith showed Idris how to do some felting - he enjoyed having a go!

Saturday, 19 May 2012

Mark Making with Driftwood

This was a spin off activity from exploring the box of driftwood that arrived. The girls had been using some lovely descriptive words to describe the markings in the wood and I thought they would enjoy exploring the textures further by making some marks in clay with them.
Rolling the balls of clay into smooth balls provided a challenge for the younger ones!
They were all spoilt for choice with the wide array of textures to choose from! and found creative ways of using the markings (see below).


Faith particularly enjoyed this - I remember one year we made prints this way using flowers from the garden. Faith made a dandelion montage - every time she went for a flower, she brought a dandelion in various stages of growth! It made for a really lovely keepsake of her toddler interests - I still have them now!

I particularly liked the one in the top middle row, and the wormwood ones turned out really prettily also!

Friday, 27 April 2012

Sewing a Freedom Quilt


We were reading Adolphus Tips recently as part of our WW2 explorations and in it there are two black American soldiers featured. They talk about freedom and hint at past slavery and it got Eve interested. So now we are off on a tangent about the history of slavery in America! I found some lovely books from this book list. I chose:
  • Sweet Clara and The Freedom Quilt (this is a really nice explanation of the freedom quilts)
  • Harriet and the Promised Land (this is a story told through poetry, but the illustrations are quite disturbing in my opinion and I haven't showed the girls yet!)
  • The Waggon (introduces how slavery ended for many with Lincoln, a nice story) .
  • If You Lived When There Was Slavery in America (Factual book - really good)
  • Escape North: The Story of Harriet Tubman (This is a graded reader, American, but is in chapters and is proving to be a nice introduction for Eve - we read a paragraph each and it is really nicely written.)
I could have got them from the library I suppose, rather than bought them, but our library never seems to have the books we want, and it takes time and frustration and then I end up buying them anyway! The girls get so much pleasure from having books to look at and I like the idea of having a home library of mixed story and factual books for us to return to time and time again (plus remember Idris will grow up to them too!).

I digress - so we cuddled up to read and Eve was really taken with the Clara book, as I thought she might be as she loves to sew! We have returned to the same story a few times and got talking about freedom quilts and what they were for and why they were made and I suggested that we could make a freedom quilt together. That was it - she was off and full of ideas........ she decided to make a journey quilt about travelling to Canada to see Uncle John Auntie Lorri (and Sam next time we go!). We looked on the Internet for some ideas about quilts and gradually a plan evolved - we sketched it out in Eve's sketch book.


We talked about how the slaves knew how to escape, and compared it with how we knew how to get to Canada. She came up with road signs, maps, and instructions and wants to work out a way to incorporate those into her modern day freedom quilt! The sketch above shows the UK on one side, Canada on the other and the Ocean in between. She wants to put two rows of seashore in between the land and the sea.

I remembered feeling inspired reading about a quilt that Soulemama made a few years back. It appealed to me because it didn't call for exact measurements and that suits my style - I don't DO precision sewing! I also thought it would allow Eve's creativity to flow without the pressure of 'making mistakes'. We are both learning sew much (snigger snigger - sorry, couldn't resist the awful pun - shan't do any more I promise!) as we go and it has been really fun.

Here are the bundles of fabric that we have to work with sew far (sorry - I know I said I wouldn't!). We raided Dunelms for the turquoise colours this morning and a trip to Hobby Craft is in order on Sunday I think. The yellow and brown fabrics are duvet covers donated by a friend today (thanks Erin!). Eve handles my Nana's sewing machine like a pro already - she likes routine and logical steps, so very quickly got to grips with the way to do each little seam and I left her to do them by herself. The first block is nearly finished (see the first pictures) and we are going to cut it to a template square shape so that all of the blocks will be of uniform size when we sew them together. I will post updates as we go - I'm not sure of the final outcome as we are making it up as we sew!
 Above are the Ocean Colours, below are the shore and land colours so far! Not all of them are traditional quilting fabrics but Eve loves the textures and we are on a budget!!!

Tuesday, 24 April 2012

Driftwood - an Amazing, Flexible Resource!

I love open-ended materials that are beautiful, natural and lend themselves to all sorts of imaginative, creative and interesting play. I have hollow wooden blocks which get a lot of use and I would like to develop the use of these materials. I planned to add driftwood to the block play a long time ago and looked every time we went to the beach but came up with very little that was useful - so I sourced some from good old eBay and was delighted with what arrived!

 We had an exciting time unpacking 8 kilogrammes of driftwood that arrived by courier - we were all enthralled by the different sizes, shapes, textures and patterns of the pieces of wood and we told each other the stories of where they came from - this one held a door lock that locked a princess in a tower........ this one was the top of a table that a family sat around and ate their dinner....... this one was the handle of  a spade that dug a vegetable garden like ours..... this one came from a tiny fishing boat eaten by a whale........ it was wonderful to hear the imagination flow!
 Many of the pieces had holes in them that intrigued Faith!
 I had carefully picked out boxes that had different types of wood - and Faith noticed this - she started to classify them into baskets and it threw up some interesting questions of how to sort them - she decided in the end on five groups - long and flat, chunky, wood wormy, twisty and little pieces. Many of the pieces fitted more than one category - long and flat but riddled with worm holes, or a little piece, but it twisted - I was fascinated watching her work through the wood.....
 Here are her efforts about half way through!
 It didn't take long for our resident explorer to notice that something new and unusual had arrived and he scooted on over to join in the action!
And what was Eve doing all this time? She was cutting holes in the cardboard box to make a lion's den - there's always one that plays with the packaging isn't there???!!!!